 Skip to content
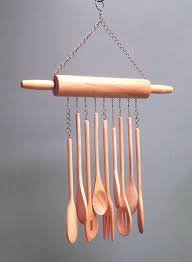
Making a wind chime from wooden spoons is a wonderful, rustic DIY project. It’s relatively simple, sounds gentle and melodic, and gives a second life to old utensils.
Here’s a complete guide to creating your own wooden spoon wind chime.
Inspiration & Design Concept
The goal is to arrange the spoons at different lengths so they sway in the wind and gently tap against each other, creating a soft, natural percussion sound. You can use a wooden plate, a slice of a log, or another circular object as the top from which to hang them.
Materials & Tools
Materials:
-
Wooden Spoons: 5-9 old wooden spoons (thrift stores are perfect for this). Using different sizes will create different tones.
-
Striker: A larger, heavier wooden object to hang in the center that the spoons will hit. A large wooden bead, a small sanded piece of driftwood, or another spoon work well.
-
Top Platform: A pre-cut wooden circle (8-10 inches), a small wooden plate, a slice of a tree branch (about 1-2 inches thick), or even an old wooden lid.
-
String/Twine: Strong, weather-resistant string like nylon cord, hemp twine, or fishing line.
-
Optional for Decoration:
-
Acrylic paint or wood stain
-
Clear outdoor sealant (like polyurethane) to protect it from the elements
-
Small beads for decoration on the strings
-
A keychain ring or small metal loop for the top hanger
-
Tools:
-
Drill with a small drill bit (1/8″ or 3mm)
-
Scissors
-
Tape measure or ruler
-
Pencil
-
Sandpaper (optional, to smooth rough edges)
Step-by-Step Instructions
Step 1: Prepare the Components
-
Clean & Sand: Wash and dry all the wooden spoons. Sand any rough spots if desired.
-
Drill Holes:
-
In each spoon: Drill a small hole through the very top of the handle.
-
In the top platform: Mark where you want each spoon to hang. For a balanced look, space them evenly around the circle. Drill one hole for each spoon about ½ inch from the edge.
-
Drill a center hole in the platform for the striker.
-
Drill 3-4 smaller holes around the very edge of the platform (these are for the strings that will hold the chime level).
-
Step 2: Decorate (Optional)
-
This is the time to paint or stain your spoons and platform. Let them dry completely.
-
If you plan to keep the chime outdoors, apply a coat or two of clear outdoor sealant to all pieces to protect them from rain and sun. Let dry.
Step 3: Cut Your Strings
-
Decide how long you want your chime to be. The spoons should hang at different lengths.
-
Cut one long string for each spoon (about 18-24 inches long to allow for tying).
-
Cut one string for the striker (slightly longer than your longest spoon string).
-
Cut three or four strings of equal length (about 12 inches) for the top hanger.
Step 4: Assemble the Wind Chime
-
Attach the Spoons: Thread a long string through the hole in a spoon’s handle and tie a secure knot (a double knot or bead above the knot will prevent it from slipping through). Repeat for all spoons.
-
Attach the Spoons to the Platform: Thread the other end of each string up through its designated hole on the platform. Pull it taut and tie a secure knot on top of the platform. Vary the lengths by tying the knots at different heights. This is key for the spoons to strike each other.
-
Attach the Striker: Tie your striker to its long string. Thread the other end up through the center hole and tie a knot, leaving it to hang about 1-2 inches below the lowest spoon.
-
Create the Hanger: Thread your three or four shorter strings through the holes around the edge of the platform. Gather all the ends together above the platform, pull them taut so the platform is level, and tie them all together in one big knot. You can then loop this knot over a hook or attach it to a keyring for easy hanging.
Step 5: Final Adjustments & Hanging
-
Take your chime outside and test it in the breeze. You may need to adjust the lengths of the spoons or the striker so they collide nicely and create a pleasant sound.
-
Once you’re happy with the sound and balance, find a perfect spot for it on a porch, in a tree, or under an eave.
Tips for Success & Customization
-
Sound Check: Before you drill, gently tap your spoons together. You’ll notice thicker, larger spoons make a deeper “clunk,” while smaller, thinner ones make a higher “clack.” Mix them for a more interesting soundscape.
-
No Drill? You can tightly wrap and tie the string around the spoon handle instead, though drilling a hole is much more secure and looks cleaner.
-
Theme It: Use matching string colors, paint the spoons in an ombre effect, or add charms or beads that match your garden’s aesthetic.
-
The Secret to Good Sound: The spoons need to be close enough to touch in the wind but not so close that they are constantly tangled. Adjusting the lengths is a process of trial and error.
Enjoy the peaceful, rustic music your new wind chime brings to your space
