 Skip to content
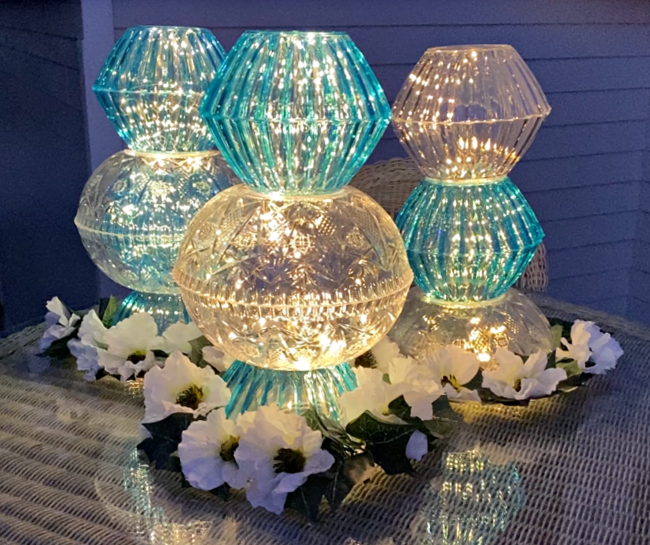
This is a fantastic and budget-friendly project. Using bowls from Dollar Tree (or any dollar store) is a brilliant way to create stunning, diffused lighting. Here’s a step-by-step guide to making magical “luminaries” or lanterns.
Table of Contents
ToggleDollar Tree Bowl Luminary Lanterns
This project transforms simple plastic bowls into beautiful, glowing orbs perfect for lining pathways, decorating tables, or hanging from trees.
What You’ll Need (All from the Dollar Tree!):
-
Plastic Bowls: Clear, frosted, or colored plastic bowls. The ones that are slightly frosted work best as they diffuse light beautifully. Get a few pairs to make multiple lights.
-
String Lights: A single set of battery-operated fairy lights. (Look for the kind with a remote for extra convenience!).
-
Craft Knife or Scissors
-
Hot Glue Gun & Glue Sticks
-
Ribbon, Twine, or Hemp Cord (for hanging)
-
Optional for Decoration: Permanent markers (for stained-glass effect), acrylic paint, faux flowers, or glitter.
Step-by-Step Instructions:
1. Prepare the Bowls
-
If you’re using clear bowls and want a frosted look, you can lightly sand the outside with fine-grit sandpaper or use a frosted glass spray paint (available at craft stores).
-
Optional Decorating: This is where you get creative!
-
Stained Glass Effect: Use permanent markers (like Sharpies) to draw colorful designs on the inside of a clear bowl. The light will shine through the colors.
-
Floral Magic: Hot glue small faux flowers or leaves to the inside of the bowl.
-
2. Create a Access Hole
-
Take one bowl and, using a craft knife or scissors, carefully cut a small slit or hole (about ½-inch) near the rim. This is where the fairy light strand will feed through.
-
Pro Tip: If the plastic is brittle, warm the area where you want to cut with a hairdryer for a few seconds to make it easier to cut.
3. Insert the Lights
-
Feed the battery pack of the fairy lights through the hole you created. Leave the pack on the outside of the bowl.
-
Gently coil the string of lights inside the bowl. You don’t need to fill it completely; a single layer will create a lovely glow.
4. Seal the Lantern
-
Run a bead of hot glue around the rim of the second, undecorated bowl.
-
Quickly and carefully press the rim of the first bowl (with the lights inside) onto the glued rim of the second bowl, creating a sealed orb.
-
Hold it firmly for a minute until the glue sets. You’ve now created a waterproof, magical glowing ball!
5. Final Touches
-
To Hang It: Cut a long piece of ribbon or twine. Tie it around the “seam” where the two bowls meet, creating a loop for hanging.
-
To Use as a Table Light: Simply place the finished orb on a table, patio, or along a walkway. The battery pack will be hidden underneath.
Other Magical Dollar Tree Lighting Ideas:
1. The “Crackled Glass” Votive:
* What you need: Glass jar or votive holder, Mod Podge, tissue paper (in your color choice), battery-operated tea light.
* How to: Crumple tissue paper and then smooth it out. Brush a layer of Mod Podge on the outside of the jar. Press the crumpled tissue paper onto the jar, sealing it with another layer of Mod Podge. The crumples create a beautiful, crackled effect when lit from within.
2. The Hanging Basket Chandelier:
* What you need: A wire hanging basket (the sphere kind), fairy lights, zip ties.
* How to: Simply wrap the fairy lights around the outside of the wire basket, weaving them in and out. Use small zip ties to secure the wire in a few places. Hang from a tree branch or pergola. It looks like a giant, glowing firefly nest!
3. Plastic Bottle “Flowers”:
* What you need: Plastic soda bottles, scissors, fairy lights, permanent markers.
* How to: Cut the bottom off a plastic bottle (about 3-4 inches tall). Use markers to color it like a flower (yellow center, pink petals). Place it over a single fairy light bulb on a string to create a field of glowing flowers.
Why This is Perfect for Summer Parties:
-
Super Affordable: Each luminary will cost just $2-$3 to make (price of two bowls + one set of lights split across multiple projects).
-
Weather Resistant: The sealed plastic orb protects the lights from evening dew or a surprise sprinkle.
-
Safe: Using battery-operated LED lights means there are no cords to trip over, and they remain cool to the touch.
-
Incredible Ambiance: The soft, diffused glow creates a warm and inviting atmosphere that feels truly magical as the sun goes down.
Head to Dollar Tree, grab those bowls, and get ready to transform your summer nights into something enchanting
